Posts Tagged ‘self-portraits’
Tony Vincent, when he visited our school in April, shared how to sketch over a photo in Keynote. Click here for his directions.
Not knowing at all how this would turn out, I decided to have the 2nd graders try sketching their self-portraits. We did discuss that this was just a time to practice and that it would most likely be rather challenging.
The students started out with taking a selfie. They were encouraged to take a fairly tight shot which would make it easier for the drawing. Then we went through the steps in Tony’s excellent “how-to” sheet. The students did a fantastic job following the instructions and I’m not sure I’ve ever seen such concentration!
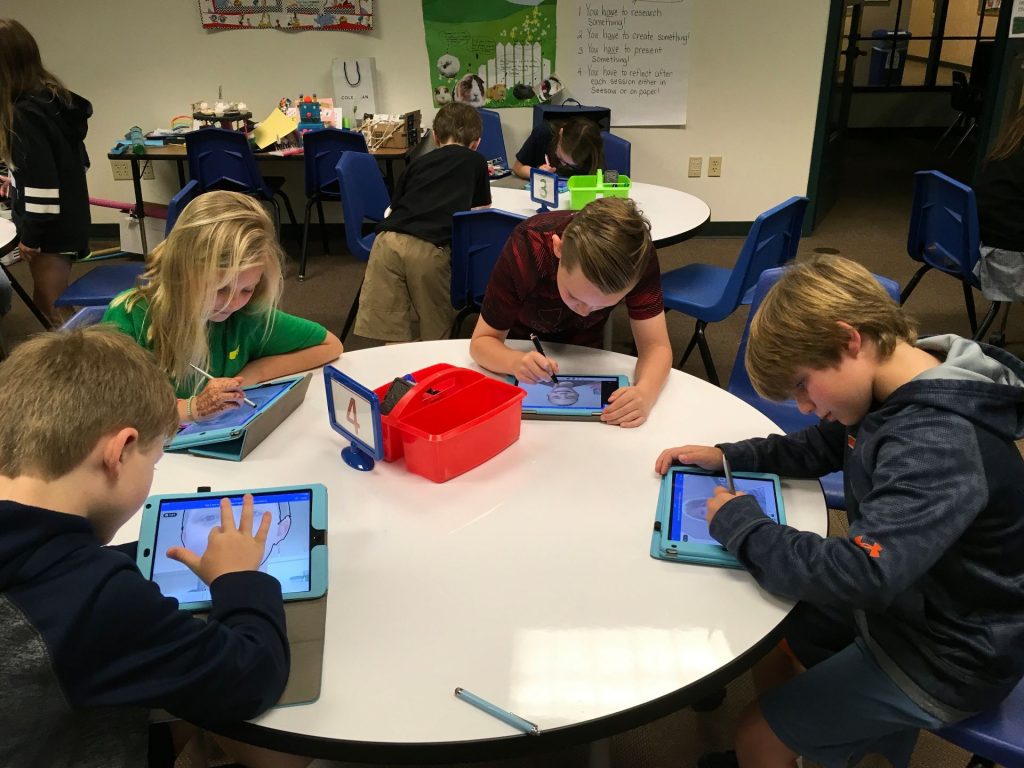
This was HARD! But, NO ONE complained, which made me super proud of these wonderful second graders. They really stuck with it!

What we discovered:
- It is SO much easier to use a pointed stylus than one of the cheap ones we have in the lab. I have an Apple Pencil and it was perfect for this activity. Sadly, it’s really too expensive to purchase class sets of good styluses.
- A selfie is probably NOT the best choice for attempting a sketch for the very first time. Perhaps a cup or an apple . . .
One of the teachers told me later that she sat next to a student who talked herself through the drawing, saying, “Come on. You can do it. Yes, it’s hard, but we’re not giving up. It’s looking good. Keep trying!”
Don’t you love that? What a valuable tool to have!

None of the classes finished the drawings. Surprisingly, no one even complained about that. When asked what they thought of the activity, the students reported that it was fun.
“Even if it was hard?” I asked. A resounding YES was the answer! We’ll be doing more sketching in the days to come.

Toward the end of each year, I hand out mirrors, have the students open Microsoft’s Paint program, and ask the first graders to draw a self-portrait. No, they aren’t let go to do all this on their own (Have you ever tried drawing with just a mouse??) – they are guided through each feature. It does take a while to complete this. This year it was three 40-minute sessions. But, it is most definitely worth it. The students really take their time and it’s very obvious that this is important to them as well as fun.
I am absolutely amazed at what these students create! And the most impressive aspect to me is how much these self-portrait caricatures look just like the young artist!
Here are the collages for the Class of 2026.


Once again we are nearing the time to send our fabulous fourth graders on to middle school. We know it’s time – they are ready, but it’s always sad to see them go. You see, we don’t have much turnover in our private school. Many of these students have been here since kindergarten so we get to know them well. And, it’s hard to let them go. The good thing is that we’ll still get to see them; perhaps not on a daily basis but we’re a tight-knit K-12 school so we really do get to watch them grow!
A few years ago, I started having the students draw a self-portrait using MS Paint. This became their avatar for various on-line applications – blogs, VoiceThread, etc. All second, third, and fourth graders did this. Then, one spring, I decided to try the self-portraits with first grade and make a collage.
This fourth grade class is the first group that has a self-portrait for each year as a “grader.” As a surprise for the students, I used Photoscape to create a collage of their drawings. Whether the children have been here for four years or one, each will receive a printed picture of their self-portraits. I have to admit that it did take me a while to pull this together – not because it was difficult! I just had so much fun looking at their illustrations, remembering when they created them, and observing how they had changed over time!
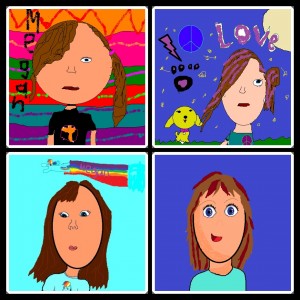
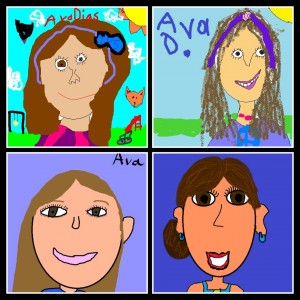
Here are some samples of their work over time. (Top row: 1st grade on left; 2nd on right. Bottom row: 3rd on left; 4th on right.)

 I hope these collages will provide special memories for the students and their families as they have done for me!
Every year I have the students draw a self-portrait using Microsoft’s Paint program. These have a variety of uses: avatars for blogs, printed for bulletin boards, “All About the Author” pages, and so on.
Mrs. Weth, one of our third grade teachers, likes to have her students use the portraits to create a video for our Grandparents’ Day. Her students write an “I Am” poem then record it with their portrait as the backdrop.
Last year she used Explain Everything for the project. This year, we chose Book Creator due to their new feature allowing users to export the book as a video. By going with this app, we were able to save the book in two formats: ePub book and video. This gives our families options on how they want to view the students’ work.
For the ePub book, choose download while on an iOS device and open in iBooks (make sure that app is installed on your device).
Mrs. Weth’s ePub book link
Every year I start the year off with the 2nd – 4th grade students making self-portraits using Microsoft Paint so that we can use them for avatars on our blogs. I like to wait till later in the year to do this with the first graders so that we have time to do a variety of drawing activities to get used to illustrating on a computer.
Drawing self-portraits is one of the few times I truly focus on direct instruction. During the first session we draw the head, neck, shoulders, and an eye. The children are always thrilled to see the copy feature – SO much easier than drawing a second eye (which never quite looks like the first!). The second session is when the students really create! All I do is show ways to add hair and then remind them to add all their features (nose, eyebrows, etc). Mirrors are provided. It’s really cute to watch them look at a mirror then examine all the colors to get that perfect match!
I am always floored at what these 6 and 7 year old students produce! Their drawings are incredible and what’s always fascinating to me is how closely their self-portraits resemble each child.
When the students have completed their work, I use PhotoScape (free) to make a class collage. These are printed and given to the children as a keepsake.
Here are the self-portraits of the class of 2025:


Last year I decided to have the first graders draw a self-portrait for an end-of-year paper “quilt” collage. The students and teachers enjoyed it so we did it again this year and I was absolutely floored by the quality of work from our children!
We use Microsoft’s Paint program at our school and the students are introduced to it as young as kindergarten. What always amazes me is how well the children do drawing with a mouse. Try it sometime! It’s not easy!
This year we upgraded our operating system to Windows 7 so the Paint program is different than what we’ve been used to – more drawing choices and easier in some ways but a bit quirky in others. For example, there are more brush choices (a good thing). But one odd quirk we’ve all noticed is that sometimes the fill bucket doesn’t fill properly. It may only fill part of the area, leaving the edges in a different color. In such cases, the student has to carefully take a paintbrush and fill in the desired color. Rather frustrating!
To begin the self-portraits, I handed out small mirrors so students could check hair and eye color. I also distributed a square template so that all drawings would be the same size. We started with the background color. That seems to be one way to prevent the fill bucket problems. The next step was to draw a large oval for their face and we walked around checking each one – “Too small, try a bigger one.” “A bit large. You might not have room for hair.” We were drawing a “head and shoulders” shot. Then the students found a skin color to fill in their oval.
Eyes were next and we really spent a lot of time talking about how those look. I told the students we would draw one eye then copy it so the second one would look exactly like the first. The pupil, the iris, the white part (sclera) were drawn using the oval tool and then filled in with the fill bucket. Some students announced that their eye was finished and they were ready to copy it but I asked them to look closely in the mirror and tell what else they saw. “Eyelashes!” several announced. We decided that the pencil would work well to draw upper and lower eyelashes. By the end of the first class, almost everyone had at least one eye and they were beginning to draw the other facial features.
In our next session, we talked about eyebrows, noses, ears, neck, shoulders, hair. It took about 1 1/2 more 40 minute class sessions for all students to finish. The students did an amazing job – they were focused and worked hard to make their self-portrait look as close to their facial features as they could. I love how they filled the square with their drawing. Enjoy their wonderful work!
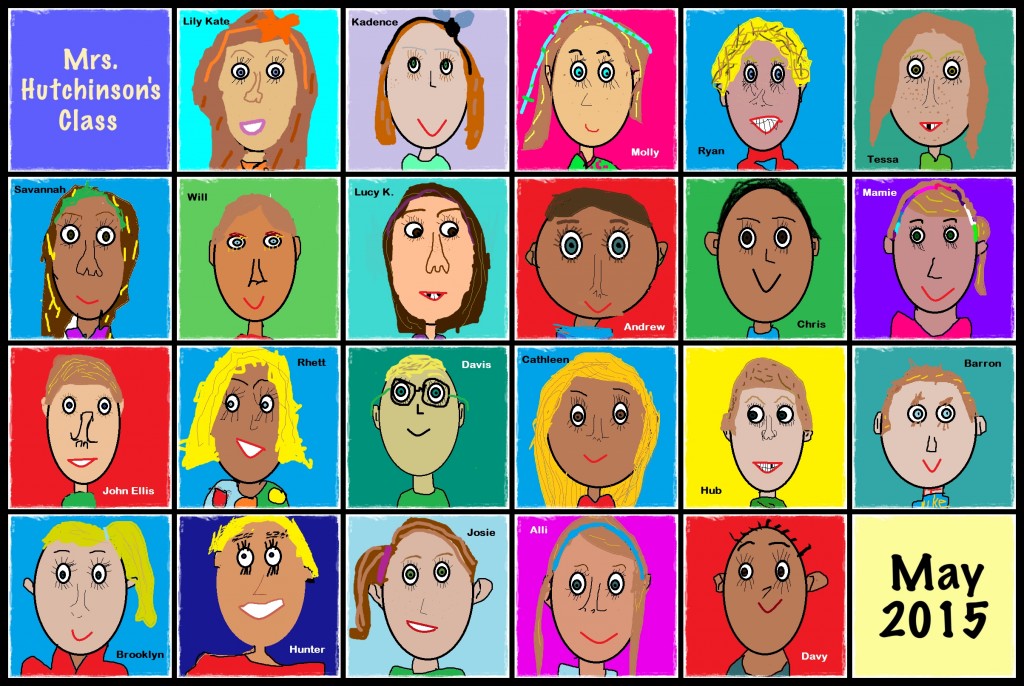
Mrs. Hutchinson’s Class Quilt

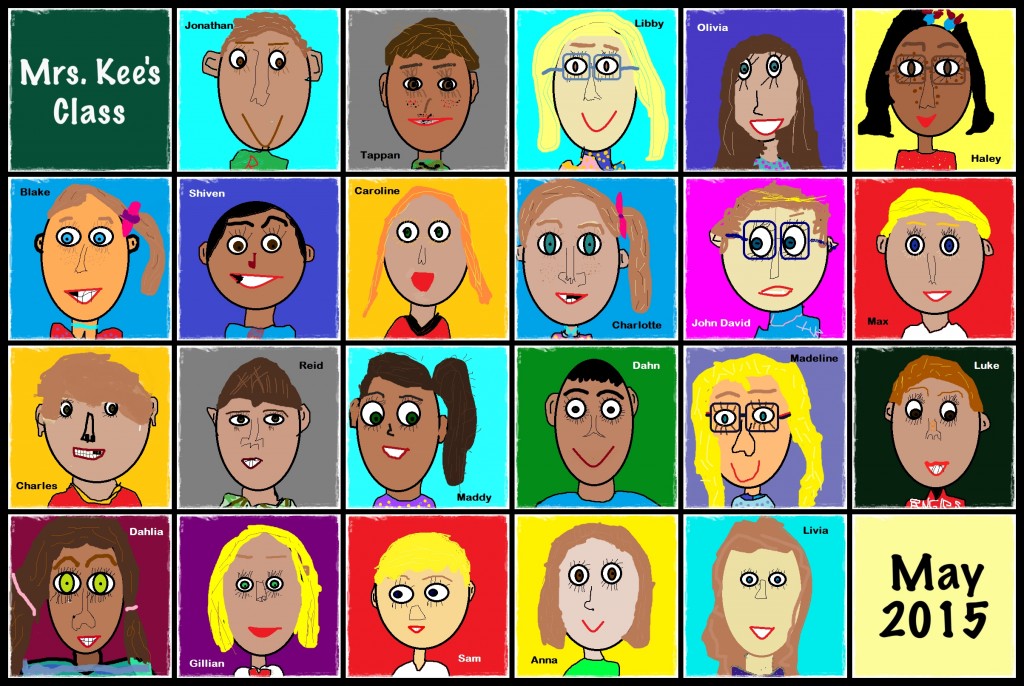
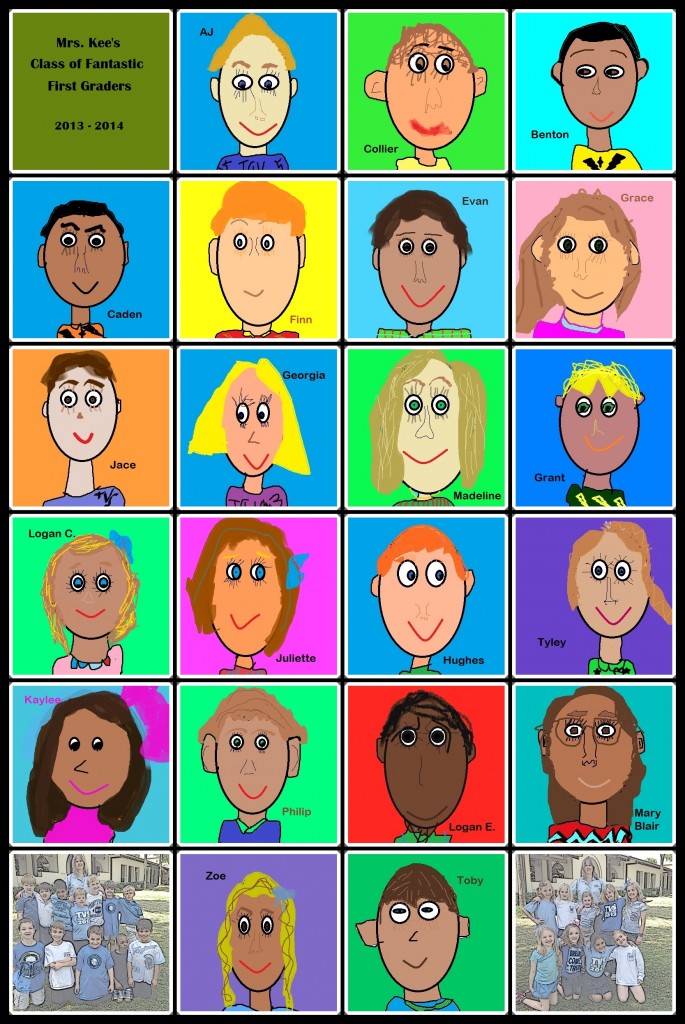
Mrs. Kee’s Class Quilt

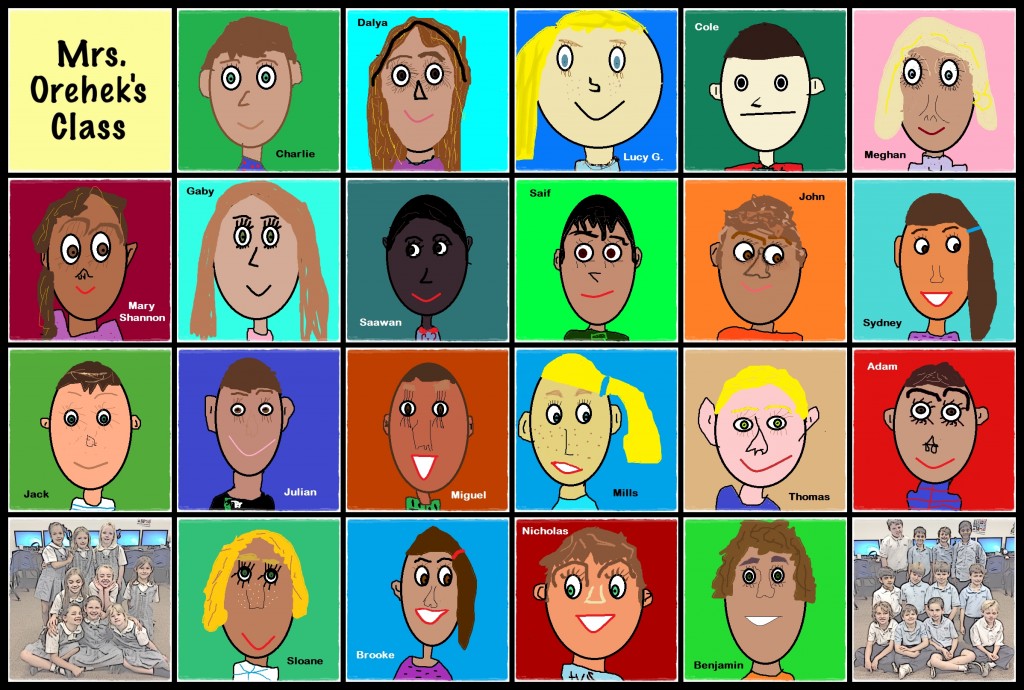
Mrs. Orehek’s Class Quilt

I used the “Combine” feature of Photoscape (a free photo editing program) to make the quilt collages.
Hints for next year:
- Draw the neck and face in the same session and fill both with the skin color. If you do this in 2 sessions, the fill bucket doesn’t work correctly (it doesn’t fill the space completely).
- Make one eye then copy and paste it in the same session. Again, this is important for the fill bucket to work properly, especially if you have to add eye color to the second eye.
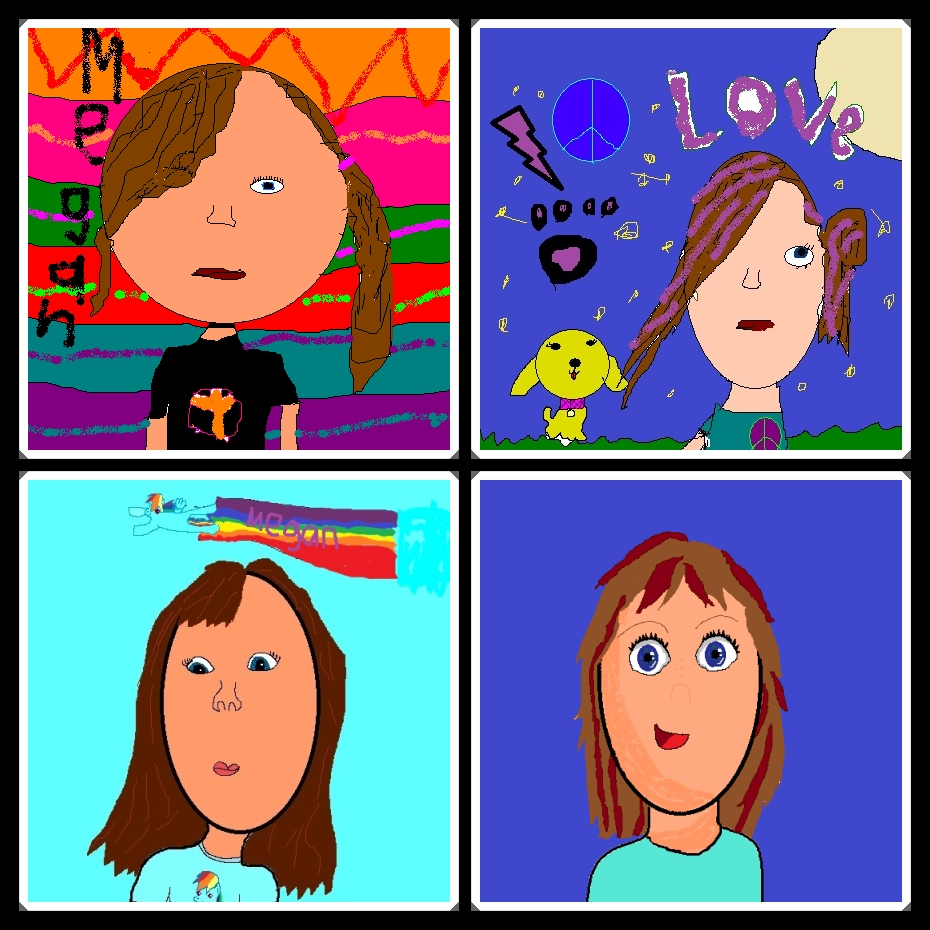
Although the 1st graders’ self-portraits were combined into a collage, the students requested ebooks of their drawings. So, here they are. Please refer to the “Dr. Seuss eBooks” post for directions on downloading these to iBooks or to a Nook reader.
Ms Cantrell’s Self-Portraits
Mrs. Kee’s Self-Portraits
Ms Orehek’s Self-Portraits
Wow! I was absolutely amazed at how well our 1st graders did creating their self-portraits in MS Paint. You know, it’s not easy drawing with a mouse (my examples always get laughs from the little ones) but we just focus on trying our best. I loved hearing as I modeled ways to draw a mouth, hair, etc – “Hey, that looks easy. I think it can do that!”
Here are the portrait collages from each class. I used PhotoScape (free editing software) to combine the illustrations.


The project took 3 class sessions (40 minutes each) and just about everyone finished in that amount of time. There was only one student who had to start over; we searched and searched but couldn’t find his drawing anywhere in his home directory. The MS Paint attributes were set at width=440 and height=440.
The students seemed to enjoy drawing themselves and really took a lot of time getting their pictures “just right.” Of course it helped having individual mirrors so that they could check every detail!
I decided on an end-of-the-year project for first grade that has the students drawing their self-portraits in MS Paint. The illustrations will be combined to form a collage that will be printed for each student.
We’ve used MS Paint once with the students but it wasn’t really a detailed drawing so I wasn’t sure how well this would work with the little ones.
After our first session, I am extremely impressed. These children are very focused on creating their portraits. Mirrors were handed out so they could check hair, eye, skin color. (It’s rather humorous to watch students hold the mirror up to their arm in hopes of getting a better view of the skin color!)
We talked about how the picture is a close-up view of each child – a shoulders and head shot. I modeled drawing a large oval for the head then we worked together to do it. Eyes are the hardest so that was our focus for the first session. We’ll have a couple more weeks to complete this. I can’t wait to see the finished portraits!
Here are a couple samples in various stages of completion.


They did it! Our second graders were able to copy and paste their bio-poem into a new post on their class blog. Then they inserted their self-portrait that had been created in MS Paint.
We would love for you to take a look at their posts (and feel free to leave comments!).
I have to admit, after starting the process with the first class, I thought this had to be one of the most ridiculous undertakings I’d ever come up with! However, since the students didn’t look too frustrated, we kept on until everyone had the poem copied, pasted, and the picture on their blog post. I should have taken pictures of their expressions when they finished. They were SO proud of themselves! Here’s a sample:

In creating their post, the students learned numerous skills:
- moving from one window to another
- selecting text to copy
- shortcuts for copying and pasting
- minimizing a window
- adding a tag for the post
- inserting a picture by finding it on their computer
- choosing the correct picture (had to be jpeg)
- the importance of saving
As I talked to Mrs. Cooper at the end of her class and mentioned that perhaps I shouldn’t be doing this with the other groups, she commented, “I think the only person that’s worn-out is you. The kids look fine and they’re proud of what they did.” I truly appreciate her encouraging words because it really did get easier as we worked with the other classes. I learned to make the steps even smaller so that each child could easily accomplish them without getting lost. We still encountered some bumps in the road but everyone has their post proudly submitted!