Published Books on the Book Creator Site
I am absolutely loving the ability to publish on Book Creator’s site. Here are some of the books we’ve created so far this year.

I am absolutely loving the ability to publish on Book Creator’s site. Here are some of the books we’ve created so far this year.

Recording in the Book Creator app
One of my very favorite apps is Book Creator. This app allows students and teachers to create interactive ePub books that can be shared with others. Hyperlinks, images, audio, and simple drawings can be added to a book. But, the best part is that it is extremely easy for students of any age to use which is why I use it for all kinds of curricular activities!
The app is available in the App Store ($4.99) as well as on Google Play ($2.49). Both offer a free version but that only allows the creation of one book. Try the free app first, but trust me, you will definitely want the paid version! As we have iPads in school, I don’t have experience with the Android version so the rest of this post will refer to sharing the books so they can be read in the iBooks app.
There are three ways to export a book made in Book Creator.
 Export as Video – This is a good method to use when sharing with people who do NOT have an iOS device. I save in both the ePub and Video formats and share links with parents. Saving to the camera roll is an option with this method. What I do is save the video to Vimeo (YouTube also works) then embed it in a blog post. Students could use this choice, save to the camera roll, and upload to their blog.
Export as PDF – Any recordings will be lost in this format.
Export as ePub – This is the choice for reading in iBooks. However, the problem is that a person can only read this on the iPad on which the book was created.
The question is: How do you share the book with others so it can be read on different iPads or iOS devices?

Here’s what has worked for me:

Choose a cloud-based storage app

Link sharing on then get link

Adding the ePub link using the Edublogs app
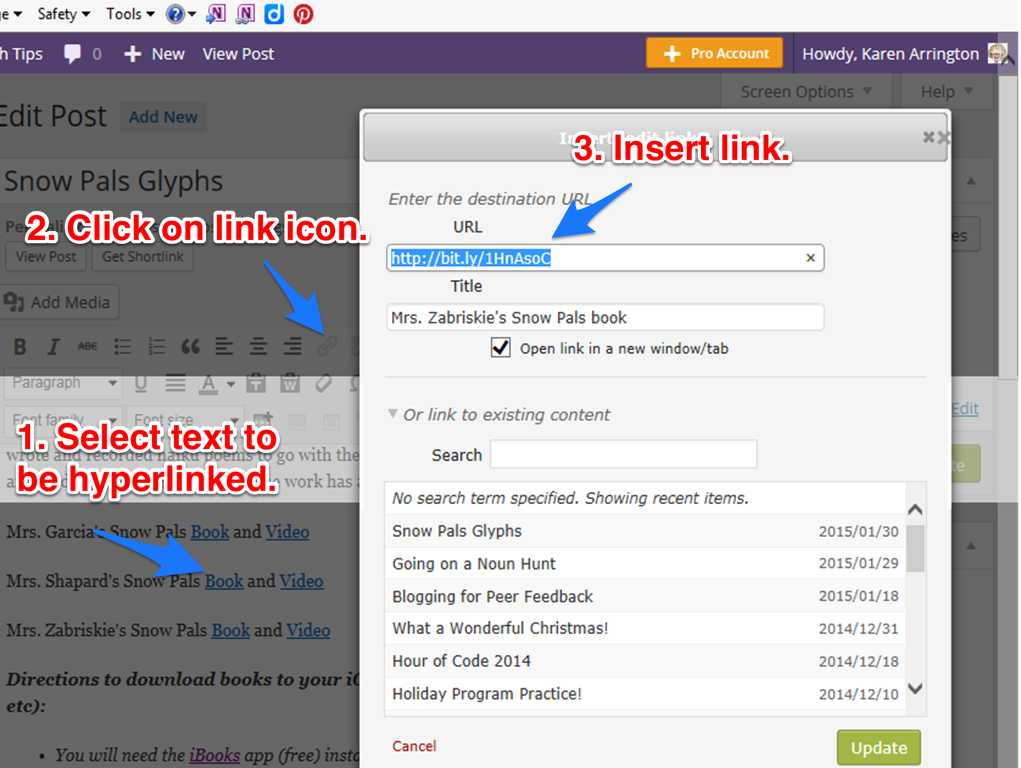
Adding hyperlink on blog using web browser

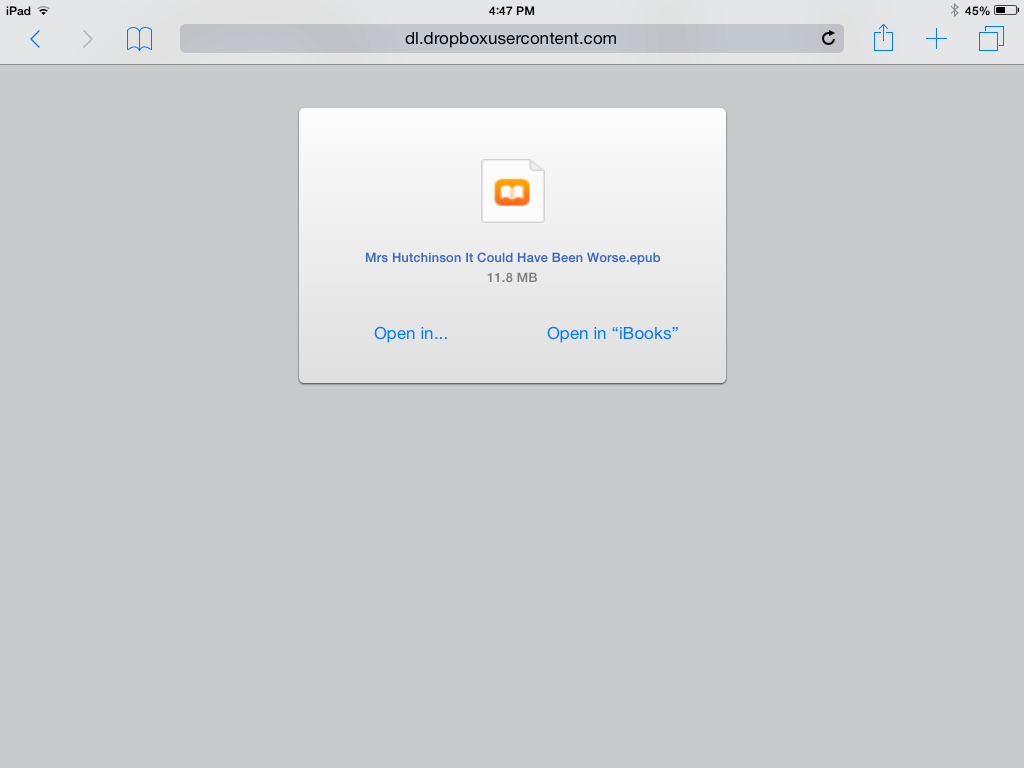
Screen shot of what downloading ePub book from Dropbox looks like

Screen shot of what downloading ePub book from Drive looks like
Opening ePub book on iOS device
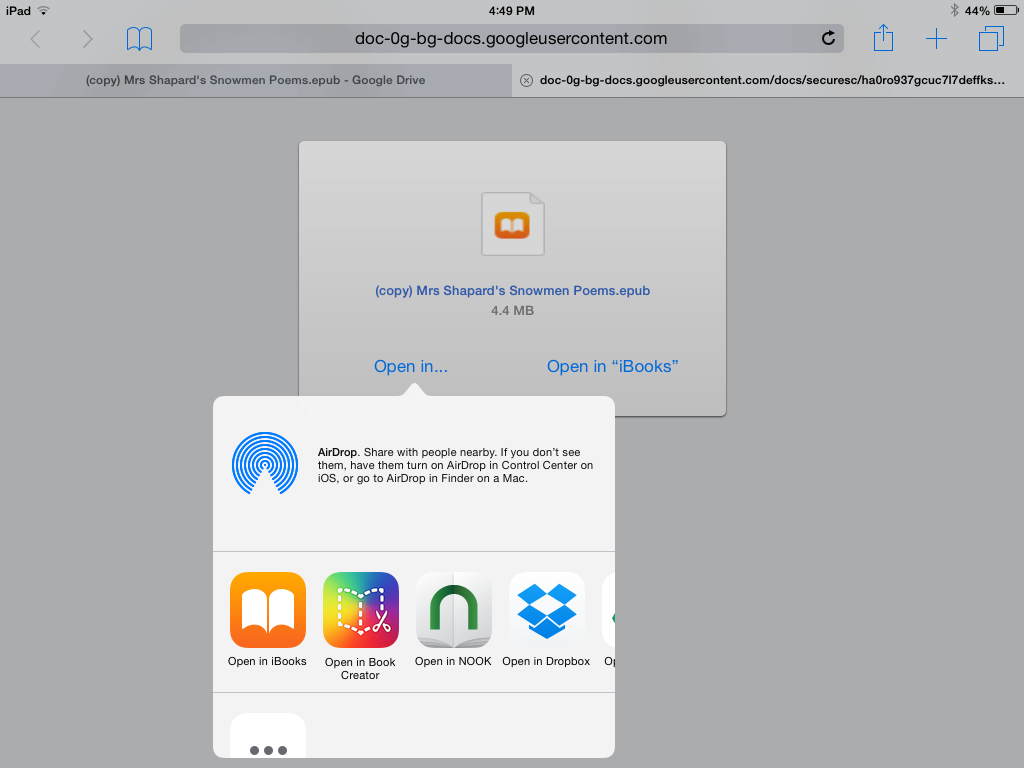
Opening the book in other apps
Although there seems to be several steps to get the ePub link onto the blog, once you’ve done this a couple of times it becomes second nature and really doesn’t take very long! Parents absolutely LOVE to read books that their child either makes on their own or has created as a class.
Have fun posting links to your own books! I enjoy seeing what others create in Book Creator. If you have questions, let me know!
TIPS:
When I link to ePub books, I always add the following information so that visitors know how to download the eBook.
Directions to download books to your iOS device (iPad, iPhone, etc):
As mentioned earlier in the post, I also save the Book Creator book as a video then upload it to Vimeo. I then embed the Vimeo video into the blog. That way, parents without iOS devices are still able to “read” the book!
If you chose to export the book created in Book Creator as a PDF, to upload it to Edublogs, you would click on the ADD MEDIA tab at the top of the post’s toolbar. The PDF would be hyperlinked as below:
Mrs. Wright, our fourth grade Language Arts teacher, asked how we could incorporate technology into a writing lesson. (Oh, SO many ideas!!)
The students are beginning their pre-writing for a personal narrative. They were to bring in a photo of a special event in their lives. In the past, the children have worked in table groups to give feedback to each other – hearing from only three other students. To maximize the responses, we decided to have the students blog about their topic and then get feedback in the comments section.
Here’s the process:
Using the iPads, each child took a photo of their photo (much easier and quicker than scanning). The students opened the Kidblog app and uploaded their image to a new post.

Taking photos to upload to blog
Because the students were going to write a lot on the blog, and since we had easy access to computers, we moved to the PCs to finish blogging and commenting. Of course, the entire process could be done on the iPad; it was just more practical for our purposes to move to the computers.
The students added a sentence or two that described their picture that would be the basis of their personal narrative. As these were submitted, I quickly approved them so that the commenting could begin!
Mrs. Wright instructed the children to ask three questions after reading a post. They were to leave comments on the blogs of their table mates’ first, then they could ask questions of their other classmates.

Asking questions
The comments flew in faster than we could keep up with approving them! Very thoughtful questions were asked. These will be used to help write the narratives. Knowing some of the questions a reader might ask will help students be more precise and descriptive with their writing.
Here are the links to the blogs:
What is a pourquoi story? Ask Mrs. Garcia’s second graders and they’ll be able to tell you that it is a type of story that tells why something is the way it is. In fact, pourquoi means why in French. Rudyard Kipling’s Just So Stories is a classic work of this genre. One well-know tale is How the Camel Got His Hump. Many cultures have pourquoi tales that have been passed down through the ages.
In a collaborative effort with technology and art, Mrs. Garcia’s students explored some of these stories using the “making smaller circles” principle (zooming in on details).
Josh Waitzkin, an eight-time National Chess Champion in his youth, attributes his success to learning techniques he developed to bring his mind and body to peak performance. In The Art of Learning, Waitzkin reveals his self-study to define techniques to maximize student achievement. One of those techniques he calls “making smaller circles.”
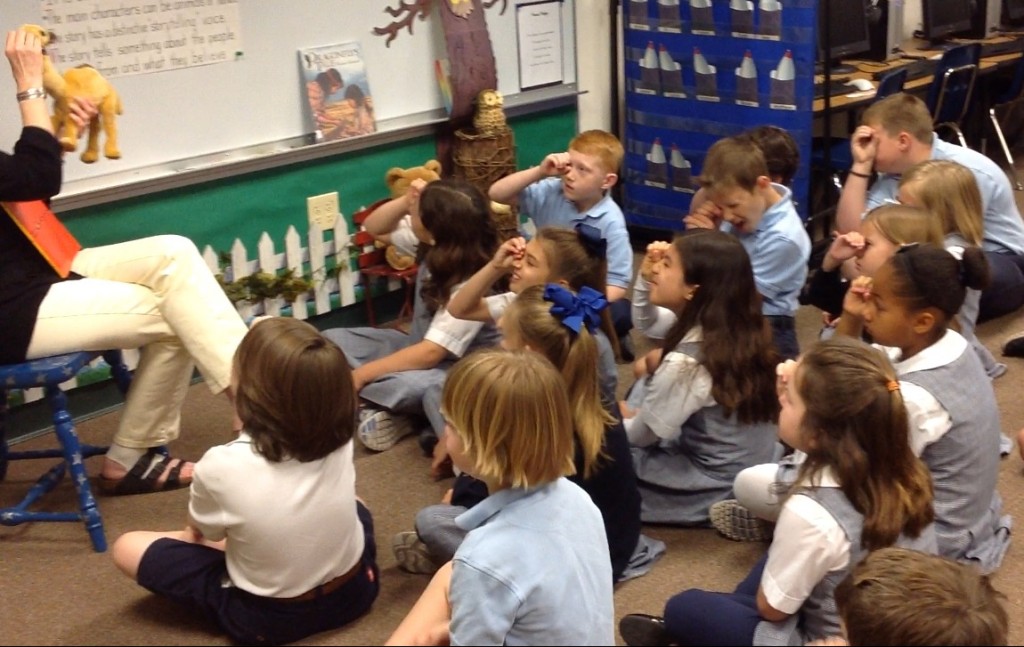
 Mrs. Garcia introduced her students to the pourquoi genre by discussing the elements found in this type of tale. She shared the camel story from Rudyard Kipling, complete with a camel stuffed animal. As she talked, Mrs. Garcia asked the children to pretend they had a magnifying glass to use to zoom in on just the camel’s hump.
Zooming in!
The students also played the “I Spy” game which is a fantastic reinforcement to understanding how to zoom in on details. In addition, the students wrote clues about an object to allow their classmates to guess. Each additional clue provided more details.

What is my object? Guess my clues.
After looking at a variety of books, the students then decided on a pourquoi tale. They examined main characters, problems, outcomes, etc and wrote their rough draft.

Determining Problem, Block/Change, and Outcome
At this point, the students were ready to begin their illustrations. Mrs. Black, our art teacher, worked with the children on how to look at the “big picture” then zoom in on the smaller details. Each child had a picture of their object and a black “window” that was used to helped focus in on a specific part. Oil pastels were used to create the colorful illustrations.

Focusing on the armadillo’s head

How the chipmunk got its stripes
For the technology part of the project, I used the Book Creator app (available from the App Store and Google Play) to create an ePub book to share with parents. I love this app because it is extremely easy to use and it has a wealth of features!
Normally, I would have each student create a page in the app then email it to me where I would combine all into one class book. However, because we wanted the formatting to be the same throughout the book, I typed the students’ work and then we recorded each child.

Recording
After photographing the completed drawings and adding them to the corresponding page, I previewed the project with the students. I wanted to make sure each picture went with the correct story and that the drawings were inserted in the direction the child wanted. (We had to change a few!)

Checking for proper orientation of illustrations
Below is the link to the finished book. While on an iOS device, click on the link to download then choose to open in iBooks. To read the book using the Google Chrome browser, click here for instructions. The file is large so it may take a few minutes to complete the download.
Pourquoi Stories: Making Smaller Circles by Mrs. Garcia’s Second Graders (ePub book)
New! The Book Creator app now allows the book to be exported as a video file. Here is a link to the book in the video version.
Extension ideas from Mrs. Garcia:
After the children completed the examination of their pourquoi stories, Mrs. Garcia asked them to create their own tales. They also worked as a class to write poetry.

Pourquoi tales from students

Poetry
Knowing how busy our teachers are but wanting to provide professional development, I started “Apps in a Flash” as a quick way to introduce an app to the Lower School faculty. The promise was a 15 to 20 minute look at an app and how it could enhance learning.
 I tried my artistic (or rather inartistic) ability using the Paper app to create a logo to hopefully generate interest.
Our first session featured Tell About This and Write About This. I had no idea how many teachers would come to the workshop so I was thrilled when 9 showed up! It was fast talking to fit everything into 15 minutes as promised! Before leaving, the teachers were asked to fill out an “exit ticket” to provide ideas on how they might use the apps with their students.
Here are their fantastic thoughts!
Tell About This:
Write About This:
A huge thanks to Allison, Jane, Leslie, Carol, Amy, Diane K, Gail, Kim, and Diane M for sharing their thoughts about the apps!

Handouts:
I believe it’s important for students to be able to share their writing with others; not just their teachers and parents. Over the years we’ve done this in a variety of ways but when the 4th graders saw a “gami” I’d made with the Tellagami app, they could not wait to give it a try! I knew we needed to come up with something that was worth sharing using this app.
Since the students had drawn self-portraits earlier in the year using Microsoft’s Paint program, we decided to use these for the background for a bio-poem. There are several variations of this type of poem but here’s the format we used (not sure where I got this but have used it for over 20 years):
Name
4 describing words
Related to ____________
Who cares deeply about __________
Who feels ___________
Who needs ___________
Who gives ____________
Who fears ___________
Who would like to see ___________
Resident of ______________.
Since the self-portraits were drawn on the computer, we had to get them to the iPad and into the Tellagami app. What worked for us was for me to upload the illustrations to my Picasa photo album, have the students go to Picasa on the iPad, and then save to photos.
During our first 40 minute session in the computer lab, I had the students get the self-portrait into Tellagami and then create their avatar. Wow, did they enjoy that! We had avatars beside the faces, sitting on shoulders, . . . Next step was to write the bio-poem.
The next day, I demonstrated how to record (super easy; they didn’t really need instructions). I had the students send their finished “gami” in two different ways. One was to email to me from the app. This leads to a link on the Tellagami website. Here is Ava’s gami.
However, I wanted to combine all of the gamis to make a class video. So I also asked the students to save their gami to the camera roll and then email the video to me. I then pulled the videos into the iMovie app. Each video ends with a shot saying, “Created with the Tellagami app” – I didn’t want that after each bio-poem so I deleted that segment on all but the last one. For an intro, I created a slide using Haiku Deck, a presentation app. Next step was to upload to our Vimeo account.
It sounds like a lot of work but it really wasn’t. Once the students had emailed their gami to me, it didn’t take long at all to pull them together in iMovie.
Malone’s BioPoems from Trinity Valley School on Vimeo.
This was a fun way to share writing with others. Not one student complained about writing a poem; that sometimes happens since I’m not their “writing” teacher! By sharing with our teachers authentic ways to use technology, my hope is that they’ll find ways to use it to modify and redefine learning in their classrooms. (Can you tell we’ve been discussing the SAMR model in Lower School?)
What is a pourquoi story? Ask Mrs. Garcia’s second graders and they’ll be able to tell you that it is a type of story that tells why something is the way it is. In fact, pourquoi means why in French. Rudyard Kipling’s Just So Stories is a classic work of this genre. Do you remember . . .?
Many cultures have pourquoi tales that have been passed down through the ages. In a collaborative effort with technology and art, Mrs. Garcia’s students explored some of these stories using the “making smaller circles” principle.
Josh Waitzkin, an eight-time National Chess Champion in his youth, attributes his success to learning techniques he developed to bring his mind and body to peak performance. In The Art of Learning, Waitzkin reveals his self-study to define techniques to maximize student achievement. One of those techniques he calls “making smaller circles.”
In Mrs. Garcia’s homeroom class, students practiced how to “zoom in” on pourquoi stories’ problems, blocks, and outcomes.

In Mrs. Black’s art class, students focused on an aspect of a subject in the story to create artwork showcasing that “zoomed in” part.

Armadillo Tattletale
Using technology, students created and recorded a class ePub book with the Book Creator app.

Screenshot of page in Book Creator app
Using PowerPoint and an image from Pics4Learning I created a zoomed-in version of a zebra using the theme of “making smaller circles.” This became the book cover for the ebook.

Mrs. Garcia, Mrs. Black, and I hope you enjoy the students’ view of pourquoi stories.
Link to the class book:
Pourquoi Stories: Making Smaller Circles by Mrs. Garcia’s Second Grade Class
Directions to download book to your iOS device (iPad, iPhone, etc):
Directions to read the ePub book on a computer:
It started with a book . .
I like to bring in literature as writing prompts. When the first graders came to the lab a couple weeks ago, I began reading It Could Have Been Worse, by A.H. Benjamin. It’s a wonderful book for making predictions and that’s just what we did!

The story is about a little mouse on his way home. Mouse slips and falls and laments that he is having a terrible day. What he doesn’t realize is that the “terrible” things that happen to him save him from snakes, fish, birds, and more. The humorous illustrations show that it really “could have been much worse!”
I read a different amount of the book to each of our first grade classes; stopping just before another “it could have been worse” part. The students were to predict what they thought might happen next. I then asked them to log onto their blog and add a comment to my post:
We just read part of It Could Have Been Worse, by A.H. Benjamin. Poor Mouse is having a hard day! Write a comment about what you think will happen to the snake and to Mouse. What do you think will be the next “But it could have been worse!” part?

After submitting their comments, the students used Microsoft’s Paint program to illustrate their prediction.
When the students finished, I then read the rest of the book. We discussed our predictions and how to use clues in the story to help us as we predict what will happen next. The students truly enjoyed the book and blogging about their ideas!
 Having introduced the Book Creator app to our teachers, I wanted to take this idea a step further. In all my years of teaching, one of my favorite activities is to make class books with students. It is very exciting to now be able to make e-books where students can add text, images, and voice recording. Book Creator is the perfect app for this and it’s extremely easy to use.
I added the students’ images to the app, copied and pasted their blog comments, and then asked the teachers to supervise recording while I worked with the rest of the class in the computer lab. The process took just a couple of weeks, meeting just once a week in the lab!

Cover of Ms Orehek’s class book

student page
Links to the class books: The Book Creator app only allows you to open the ePub book on an iOS device with the iBooks app (i.e. iPad, iPhone, iTouch); not on a PC. Downloading instructions are below the book links. We hope you enjoy the books!
Directions to download to your iOS device:
I’ve added a few writing links on the newly-added writing page. You’ll find interactives for students along with sites with lesson plans for teachers.

image from Phillip Martin Clip Art